Thursday, December 30, 2010

Feeling a Little Cheeky

It's been a while since my last post! The holidays and preparation for them took up so much of my time. It's the day before New Years and I am exhausted and I was planning on something easy to make for supper. I was browsing through some of my international cookbooks last week and came upon this simple dish. The cookbook is "The Scandinavian Cookbook" by Trina Hahnemann. I thought it would be the perfect recipe to make for a winter's evening


Ms. Hahnemann is a Danish TV Chef and food writer. I was lucky enough to grab an advance copy of this book through librarything.com last year. It is a beautifully photographed cookbook with recipes arranged by season. I highly recommend it.

The recipe I chose is SO easy! Be sure to start it in advance, as the meat has to marinate at least 12 hours.  If you can't find pork cheeks, you can substitute pork shoulder as I did. I used half of the meat and half of the vegetables since there is only 2 of us.  Also, since I had some leftover mashed potatoes on hand I skipped the whole potatoes. I also thickened the sauce with a little corn starch and beef broth. Here is the original recipe:

PORK CHEEKS IN BROWN ALE (Serves 8)
The Scandinavian Cookbook, Trina Hahnemann, 2009

4 pounds pork cheek (I used pork shoulder as a substitute, cut into chunks)
3 cups brown ale or similar dark ale (I used Newcastle Brown Ale.)
1 tbsp coriander seeds
1 tbsp peppercorns
3 tbsp olive oil
10 thyme sprigs
salt and pepper
1 1/3 pounds potatoes, peeled and thickly sliced
3 carrots, peeled and thickly sliced
3 turnips, peeled and thickly sliced

In a glass or ceramic bowl, marinate the meat in the borwn ale, coriander seeds, and peppercorns for 12 hours or overnight.


The next day, remove the pork from the marinade. Heat the olive  oil in a casserole and brown the meat on all sides. Add the liquid from the marinade (I strained out the peppercorns and coriander seeds), then the thyme and some salt. reduce the heat and simmer for 1 hour.


 Add the potatoes to the casserole and simmer for 15 minutes. Add the carrots and turnips and continue cooking for another 15 minutes or until the vegetables are tender. Season with the salt and pepper, then serve just as is - the taste is very full and aromatic.


Goes great with a salad and a warm loaf of crusty bread.

Enjoy!


Thursday, November 4, 2010

Rainy Daze and Chocolate Craves!

What is better than the aroma of cookies baking on a rainy fall day? I decided to pull a recipe from "Chocolate Snowball and other Fabulous Pastries from Deer Valley Bakery" by Letty Halloran Flatt.


The book can be purchased on Barnes and Noble.com:
http://search.barnesandnoble.com/Chocolate-Snowball/Letty-Halloran-Flatt/e/9780762761111/?itm=1&USRI=chocolate+snowball

Deer Valley Bakery was a bakery at  Deer Valley Ski Resort in Park City, Utah (it has since been renamed Snow Park Bakery). One of the great things about this cookbook is that it includes adjustments for high altitude baking (this is great for my friend's daughter, who moved to Montana).

Letty Flatt has a cooking blog if you're interested: http://muffintalk.wordpress.com/
Her blog states she is a vegetarian gourmet cook, so it is full of great recipes if you're into vegetarian cooking or good healthy cooking!

I was looking for something that would go well with a big cup of coffee or hot chocolate. I think this recipe satisfies the bill. This makes a crisp cookie (also good for dunking in milk!).

CHOCOLATE ESPRESSO SLICE and BAKE

1/2 lb (2 sticks) unsalted butter
1/2 c and 1 tbsp sugar
1/2 c firmly packed brown sugar
1 egg
2 tsp instant espresso coffee powder
1 tsp vanilla extract
2 c all purpose flour
1 tbsp cocoa powder
1tsp ground cinnamon
3/4 tsp salt
4 oz bittersweet chocolate, grated*

* You can use the grater attachment of a food processor if you have one.

Mise en place.

In a large bowl, using an electric mixer (I used a stand mixer), cream the butter, sugar and brown sugar until light and fluffy.  In a small bowl, whisk the egg with the espresso powder and vanilla.  Add to the butter mixture; scape the sides and bottom of the bowl. Sift together the flour, cocoa powder, cinnamon and salt.  Mix into the creamed butter, scraping again. Stir in the grated chocolate.
Note: For high altitude: Eliminate the extra tbsp of sugar, reduce the brown sugar to 1/3 c.

Finished dough (try not to eat all of it!).
Divide the dough in half. On a piece of parchment or waxed paper, form each portion of the dough into a 1 1/4 inch square (or round) log, 11" long. Wrap the parchment around the log and use it to square up the corners. Refrigerate for 2 hours or freeze for 45 minutes (I used the time to clean up my messy kitchen!), until firm enough to slice.  You can bake one batch now and save the other for later (perhaps when surprise company arrives?).

Roll out dough into an 11" log.

Dough ready for the freezer.
Preheat the oven to 325°.  Line 3 large baking sheets with parchment paper or oil them lightly with canola oil.  Slice 1/8" squares (or circles) and arrange on baking sheets 1/2" apart.

Slice cookies 1/8" thick.
Ready for the oven!
Bake 12 - 15 minutes, until the cookies have lost their wet shine and you can slide a cookie on the baking sheet and it will move without losing shape. My oven is a perfect 325° and the cookies took 12 minutes.

Perfect!
 Makes about 9 dozen cookies (I did indeed get 4 1/2 dozen from one cookie log).

These are a delicious crispy cookie with mocha and a little hint of spice! Too plain for you? Then dress them up!
How about a little sandwich cookie with a Nutella center?


Of course, you can sandwich them between other gooey things like Marshmellow Fluff, frosting, jelly etc....

Thinking this would be a great cookie for Christmas too!

Enjoy and Happy Baking!

Wednesday, October 13, 2010

Apples and the Garden of Eatin'

Recently my husband was asked to participate in an Italian pot luck at his work. It was a good excuse for me to try a recipe from Nick Malgieri's cookbook, Great Italian Desserts.
The book is out of print, so if you can snare a good used copy, go for it. The only downside to this cookbook is that there are no photos (nil, nothing)! I am one of those folks who generally needs picture gratification, and I don't normally buy cookbooks without pictures, but this is one I made an exception for.


I wanted something relatively simple, so after browsing through the recipes, I decided on Torta di Mele Ampezza, Apple Cake from Cortina d' Ampezzo. Cortina d' Ampezzo is a little town located in the Dolomite (Alps) mountains in Northern Italy. The town has provided mountain backdrops for such films as Cliffhanger, Krull and The Pink Panther. The resort was also a major location for the James Bond film For Your Eyes Only (thank you Wikipedia).

This quickly prepared apple cake is simple and delicious. Use a firm, tart apple such as Granny Smith or Pippin.

Ingredients:
8 tbsp (1 stick) unsalted butter 
1/2 c sugar
pinch of salt
3 large eggs
1 1/2 c all purpose flour
1 tsp baking powder
4 large tart apples (about 2 lbs) Suggest Granny Smith, Pippins or Northern Spies
1 tbsp suger
1/4 tsp cinnamon


Combine the butter, sugar, and salt in a mixing bowl and beat till soft and light, either by hand, with a hand mixer set at medium speed, or in a heavy duty mixer with a paddle attachment. Beat in eggs one at a time, beating well between each addition. Combine the flour and baking powder and sift once. Stir the flour mixture into the batter. Spread the batter evenly into the bottom of a butter and paper lined 9" springform pan.


Peel, core and halve the apples. Cut each half into 3 or 4 wedges and arrange the wedges on their sides, overlapping slightly, on the batter, about 1/2" from the sides of the pan. Fill in the center with more apple wedges, fanning them out from the center. Sprinkle with the sugar, then the cinnamon. 


Bake the torta in the middle level of a pre-heated 350 degree oven for about 40 minutes until the apples have  taken on a deep golden color and the torta feels firm when pressed in the center with a fingertip.


Cool the torta in the pan for 5 minutes, then unbuckle the sides of the springform pan and slide it off the base, still attached to the paper, to cool on a rack.


After the torta has cooled completely, run a knife or a spatula between the torta and the paper, slide the torta from the rack onto a platter, and pull off the paper.


Keep the torta loosely covered at room temperature.


Makes about 8 serving


This cake would also go well served with a cream anglaise sauce:
http://allrecipes.com//Recipe/creme-anglaise-i/Detail.aspx


Baking the Easy Way Out - One Bowl Butter Cakes

One of the great things about the next recipe is that you mix it all in one bowl and blend it all together at the same time.  The ingredients are added in an order that ensures mixing without over beating. What could be easier? The recipe can be made with an electric mixer and bowl or in a stand mixer. Again, we're using the book Reader's Digest Kitchen Secrets. In addition to the One-Bowl Devil's Food Cake, the recipe can be modified to make a Chocolate Praline or Spice Cake.


Hints:  The recipe calls for cake flour. You can use all purpose flour, but the cake won't be as delicate. If you use AP flour, reduce the amount of flour in the recipe by 2 tablespoons per cup (1/4 c total).  
The recipe also calls for buttermilk. If you don't have any on hand, you can substitute 1 tbsp of lemon juice or vinegar in 1 cup of milk. Allow the mixture to stand for about 15 minutes to thicken.

Devil's Food Cake

1 tbsp unsweetened cocoa powder (for dusting the pan)
2 cups sifted cake flour
1 1/2 tsp baking soda
1 tsp salt
1/2 tsp baking powder
1 1/2 c sugar
1 c buttermilk, at room temperature
1/2 c (1 stick) margarine or butter, softened
1 tsp vanilla extract
3 eggs, at room temperature
3 oz semi-sweet chocolate, melted


1. Preheat oven to 350 degrees F. Grease 2 - 9" cake round cake pans, dust with cocoa, and tap out excess.
2. With an electric (or stand mixer) at low speed, beat all the remaining ingredients for 1 minute, scraping sides of bowl occasionally. Increase speed to medium high and beat 2 minutes longer, scraping sides of bowl twice.
3.  Pour batter into prepared pans and bake until toothpick inserted in the center comes out clean - about 40 minutes. Cool cakes in pans on racks 10 minutes, then turn out of pans and cool to room temp. Fill and frost with Butter Cream or Chocolate Butter Cream  Frosting. Makes 12 servings.


Butter Cream Frosting:


1/2 c butter or margarine, softened
1 box (1 lb) confectionery sugar
1/4 c light cream
2 tsp vanilla extract
1-2 drops food coloring, if desired.


1. In the bowl of an electric mixer, cream butter at medium high speed till light and fluffy. 
2. Reduce mixer speed to medium and alternately beat in sugar and cream, a little at a time. Add vanilla and beat till creamy. makes enough to fill and frost 1- 9" layer cake, or to frost 1- 10" tube cake, one 13"x9"x2" sheet cake or 24 cupcakes.

To make Chocolate Butter Cream: Prepare frosting as directed, except add 3 oz melted semi-sweet chocolate or 1/2 c sifted unsweetened cocoa.

Since the frosting contains cream and butter I recommend keeping it in the refrigerator if not consumed immediately.

                                                     
Variations: 


To make the Chocolate Praline Cake - Prepare above cake recipe as directed except dust cake pans with flour instead of cocoa, substitute firmly packed light brown sugar for the granulated sugar and fold 1/2 c toasted chopped pecans into the batter.


To make the Spice Cake - prepare above cake recipe as directed except dust pans with flour instead of cocoa, substitute firmly packed light brown sugar for the granulated sugar, omit chocolate, and add 1 tsp ground cinnamon, and 1/2 tsp each ground nutmeg and ginger and 1/4 tsp each ground allspice and cloves.


Orange Butter Cream Frosting - prepare Butter Cream Frosting substituting 1/4 c orange juice for the cream and adding 1 tbsp grated orange zest.


Saturday, October 9, 2010

Fall is Here, and it's Getting Chili!

Fall not only brings the changing of the leaves and football, it also makes me hungry for a good bowl of chili. This is my all-time favorite recipe. The cookbook is Reader's Digest Kitchen Secrets (A Culinary Survival Guide to Tips, Techniques & Hundreds of Recipes). I just love the simplicity of this cookbook. I highly recommend it...it's just good old fashioned cooking! For dessert, try one of the One-Bowl Butter Cake recipes in the book such as Devil's Food Cake (which will be my next entry).

TWO ALARM CHILI

2 tbsp vegetable oil
2 lbs lean ground beef chuck or round (ground turkey, venison or bison works well also)
2 largeyellow onions, chopped
2 large sweet green peppers, chopped
3 cloves garlic, minced
1 can (28 oz) whole plum tomatoes, coarsely chopped with their juice
1 can (12 oz) beer
1 medium sized jalapeno pepper, cored, seeded and finely chopped
1 tbsp tomato paste
4 - 5 tbsp chili powder (I use 4 tbsp regular, and 1 tbsp of Penzey's medium hot)
1 tbsp ground cumin
1 1/2 tsp salt
1 tsp dried oregano, crumbled, or 1 tbsp chopped fresh oregano
1 tsp ground coriander
2 cups drained and rinsed canned kidney beans (can also use 2 cans Navy or Great Northern beans.    
     Sometimes I will use a can of the red beans with a can of white)

1.  In a 5 quart Dutch oven over moderately high heat, heat oil one minute. Add beef and saute', breaking up chunks of meat with a wooden spoon until browned - 5 to 7 minutes. Drain off all but 1 tbsp fat.

2.  Reduce the heat to moderate, add onions, green peppers and garlic and cook, stirring occasionally until soft - 8 minutes.

3.  Add tomatoes, beer, jalapeno, tomato paste, chili powder, cumin, salt, oregano and coriander. Bring to a boil over high heat. Reduce heat to low and simmer uncovered, stirring occasionally until thickened - about 25 minutes. If chili becomes too thick, thin with a little water.

4.  Stir in the beans and cool 5 minutes more. Makes 8 servings.

                                                              
 Usually I also add a can or two of the Hunts Fire Roasted Diced Tomatoes.

This is delicious with grated sharp cheddar cheese or Kraft Mexican Four Cheese blend , some chopped green onion and sour cream.


Wednesday, September 8, 2010

How to Have Your Cake and Eat it Too (In Less Than 30 Minutes)!

I was looking for a quick chocolate fix and this is an easy recipe that you can make in no time to satisfy your chocolate craving! The book I'm using is the Red Cat Cookbook. The Red Cat is a New York City restaurant featuring American Noveau/Mediterranean cuisine. 


DEVIL'S FOOD CAKE
With Chocolate Sauce and Dark Chocolate Sorbet

Ingredients:
1 1/2 tbsp butter, melted plus extra for                                      1 egg
  for greasing muffin tins                                                            1 egg yolk
1/2 c flour plus extra to flour muffin tins                                     1/2 c buttermilk
3/4 c sugar                                                                               1/4 c warm brewed coffee
6 tbsp unsweetened cocoa powder                                           1/2 tsp vanilla extract
  (preferably Valrhona)                                                              Chocolate Sauce (follows)
3/4 tsp baking soda                                                           1 pint chocolate sorbet (or ice cream of your
1/4 tsp baking powder                                                             your choice)                                                                  
Ingredients for the cakes (minus the butter which was in the microwave)

Preheat the oven to 375 degrees.
Make the cakes: Butter and flour 8 muffin cups (I used a six cup popover pan to give the cakes some extra height. I also used Pam for Baking spray instead of butter and flour to coat the cups). In a large bowl, whisk the sugar with the cocoa, flour, baking powder and baking soda. In another bowl, whisk together the egg, egg yolk, buttermilk, coffee, (I added an extra 1/2 tsp of instant expresso powder for more coffee flavor), melted butter and vanilla. Whisk the egg mixture into the dry ingredients.

Dry and wet ingredients
 Pour the batter into the cups and bake until a toothpick inserted into the center of a cake comes out clean, approximately 15 minutes. Let cool slightly, then invert the cakes onto a wire rack and cool completely.

Before

After


Cakes cooling on the rack.


To serve, place an inverted cake onto each of 8 plates (or in my case, 6), drizzle with chocolate sauce, and set a scoop of chocolate sorbet (or your choice or none at all) alongside. 


I must admit...I had some chocolate sauce I had made previously in the refrigerator that I just warmed up. I just couldn't wait to make new. However, you can also use a store bought chocolate sauce or topping if you want.  This would be great with perhaps a raspberry or caramel sauce also. Add some nuts, whipped cream, whatever. Bottom line is you can make these little gems in less than 30 minutes.  Most of you will have the ingredients for the cakes on hand. Great for when you have company drop in on you with no notice!

Chocolate Sauce
1 tbsp light corn syrup
1/3 c water
4 oz semisweet chocolate, coarsely chopped (recommended: Valrhona 70% Guanaja)
1 oz bittersweet chocolate (not unsweetened) coarsely chopped (recommended: Valrhona 61% extra bitter)
1 tsp vanilla extract

Pour the corn syrup and the water into a medium, heavy bottomed saucepan and bring to a simmer over medium heat.  Lower the heat to low and stir in the chocolates till they are melted and the sauce is smooth. You should have about 1 cup of sauce. Remove the pan from the heat and let cool until warm but not hot. Stir in the vanilla extract.


Friday, September 3, 2010

A Berry Close Call!

It's been a while since I last posted. The summer has been so busy, especially going back and forth between our  homes in Northern Virgina and our getaway in the mountains overlooking the beautiful Shenandoah Valley in the western part of Virginia.

During the month of July we had to say goodbye to a good friend who was returning back to sunny California for his job. I decided to have a small farewell dinner to wish him well.  While making a trip to my favorite grocery store, I couldn't help but notice the luscious organic strawberries and decided to make a berry tart. This almost resulted in a big disaster on my part! I didn't realize how much time it takes to make a fresh berry tart. You have to leave time for the pastry dough to chill and the sweet pastry cream also needs time to chill and set after it cooks. Once the shell is baked, it needs to sit until it's cold.  I barely had enough time to complete the tart and chill it briefly for serving. Even then, it could have used some more chilling time. From start to finish, it took me about 2 hours to complete. But my guests didn't complain, so I ended up with a  berry happy ending.


The recipe I used is called Fresh Fruit Tartlets from the cookbook "Perfect Fruit Desserts" by Anne Willian.

 
I made one large tart instead of the 8 tartlets the recipe yields. Perhaps if I made individual tartlets, the filling would have set better because they would have needed less time to chill and set. Since the recipe is very extensive I have scanned it and  I will gladly email a copy of it to anyone who wants it.  For now, I am only going to share my pictures and the final result (sorry, picture only!).

This is the flour into which you have made a well and added salt, egg yolks, sugar and vanilla for the pastry shell.

You use a rolling pin to pound the butter to soften it slightly.

   
Softened butter added to the well.                         


You work the ingredients in the well with your fingertips until thoroughly mixed into a ball. Then you lightly work the dough until it is very smooth, about 1 - 2 minutes and reshape into a ball. Once the dough has chilled for at least 30 minutes, it can be rolled and formed into tartlets or one large tart. Then you have to let them chill again till firm, around another 30 minutes. Then it can finally be baked and cooled before adding the pastry cream.


A vanilla bean is added to boiled milk and the liquid sits for 10 - 15 minutes for flavor. You can use vanilla extract if you prefer.


The finished pastry cream after the other ingredients (egg yolks, flour and sugar)  have been added and cooked for the appropriate time. The pastry cream needs time to cool before adding to the shell.


The cooled shell is filled halfway with the pastry cream, the berries are arranged on the top and then the berries are brushed with an red currant jelly glaze to make the fruit look nice and shiny.


Doesn't this look lovely?

Lesson learned: Don't forget to make sure you have enough time to complete a recipe before you make it and serve it.


Just a P.S. -  Don't throw those egg whites away when making this recipe! They can be used for an egg white omelet, making coconut macaroons, meringue cookies or angel food cake just to name a few options!

Wednesday, June 23, 2010

Going Bananas on a Hot Summer Day

Ugh, I let my bunch of bananas get too ripe!   I'm sure it's happened to all of us. Today I decided to take a break from real cooking and make potato salad, throw some dogs on the grill and doctor up a can of baked beans.  But I still needed to do something with the bananas since I didn't want to waste them. I wanted to make something simple since I wasn't in the mood to make anything fancy. So I dug out Flo Braker's "Baking for All Occasions, A Treasury of Recipes for Everyday Celebrations". To be honest, I'm not sure I've ever used this book. I'm a cookbook junkie, or worst case, a cookbook hoarder!


There are 8 recipes with bananas as the main star, and I picked the easiest. This recipe is called Banana Streusel Snack Cake.

INGREDIENTS

Streusel
6 tablespoons all-purpose flour
6 (packed) tablespoons light brown sugar
3 tablespoons unsalted butter at room temperature
1/4 teaspoon cinnamon

Cake
2 cups unsifted cake flour
1 teaspoon baking powder
1/2 teaspoon baking soda
1/2 teaspoon salt
1 cup ripe mashed banana (2 large or 3 medium)
3 tablespoons whole milk
1 teaspoon vanilla
1/2 cup butter
1 cup sugar
1 large egg

INSTRUCTIONS
For the streusel: Using your fingertips, mix together the flour, sugar, butter and cinnamon until lumpy; set aside.

For the cake: Adjust rack in lower third of oven; preheat oven to 350 degrees. Grease and flour a 9 x 5 x 3-inch bread pan (see Note).

Sift the dry ingredients onto a sheet of wax paper. Mash the bananas in a medium bowl, then add the milk and vanilla; blend well.

Using an electric mixer, preferably with a paddle attachment, or a hand mixer, cream the butter and sugar until fluffy, beat in the egg until completely incorporated. Add the banana mixture (it will look curdled, that's OK). With the mixer on low speed, gradually add the flour mixture. Spoon the batter into the prepared pan and smooth the top with a rubber spatula. Sprinkle the streusel over the top.


Bake for 40 to 50 minutes, until a cake tester comes out clean (not sticky) when inserted into the center of the cake.


Place the cake in its pan on a rack to cool for 10 minutes. Then, gently tap the pan on the counter to see if the cake is releasing from the sides. Place another rack on top of the cake, invert, and carefully remove the pan. Place the other rack on the cake again and invert streusel-side up. Let cool completely before slicing.


Serves 12.

Note: The cake also may be baked in an 8 x 8 x 2-inch square baking pan for about 35 minutes. The cake also freezes well, wrap securely in plastic wrap, then over wrap in foil.


The batter is a beautiful vanilla color and very fluffy. Oh, and for those of you who like to lick the bowl...you're in for a treat....it's delicious!  The end result is a cake with a very subtle banana flavor.  It would make a nice breakfast coffee cake or just something good to snack on, like I'll do later this evening.

Recipes from Rue Royal...Memories of the Court of the Two Sisters

Today is a toasty one in Northern Virginia. The humidity can really get to you, though today it's relatively low at 50%. It seems like a good day to enjoy something light and easy for dinner. Since my mind is still in New Orleans (a.k.a. The Big Easy or Crescent City), let's take a walk down to 613 Royal Street to the Court of the Two Sisters  http://www.courtoftwosisters.com/

It was here where I first fell under the spell of the the wisteria. The Court of the Two Sisters restaurant features a beautiful old courtyard surrounded by luscious purple wisteria. I remember enjoying the Sunday jazz brunch here years and years ago. I was dining outside near the fountain, under the weeping wisteria, listening to the sounds of the jazz band playing inside with a mimosa in hand (also a first!) and eagerly sampling a huge hot and cold buffet of Creole dishes. It felt like I was in a magical place!  Of course, I gladly paid for a copy of their cookbook to take home as a souvenir. I still use it, especially this time of year when I need something cold and easy.


Tonight's menu will feature a light dinner of Cajun Pasta Salad and Steamed Shrimp with traditional  Remoulade Sauce.

Both recipes are from "The Court of the Two Sisters Cookbook, With a History of the French Quarter and the Restaurant"  by Mel Leavitt. You can find it on Amazon new for $10.85 and used for as little as $1.28 plus shipping ( I frequently buy my books here. Generally you can get used copies in excellent condition).

The recipes:

Cajun Pasta Salad

1 lb elbow macaroni
1 lb smoked sausage (I use low fat smoked turkey sausage. You may saute briefly before adding)
1/2 c red peppers
2 green peppers, diced
1 tbsp garlic, pureed
2 stalks celery, diced
1/2 white onion, diced
2 tbsp Toulouse seasoning (combination of salt, white pepper, black pepper, onion powder, cayenne pepper,
     paprika and thyme in equal amounts of 1 tbsp each).
2 bay leaves
1 tbsp Creole mustard (I use Zatarain's)
1/4 c white vinegar
3/4 c salad oil
1/4 c parsley

Cook the pasta in boiling water till al dente. Remove from the heat, drain, rinse and cool.  Combine all ingredients in a large bowl. The dish is best served at room temperature; however, chill thoroughly if preparing ahead of time and allow to stand for one hour till serving. Serves 6 large portions or 12 smaller portions.

If you like less heat, add less of the Toulouse seasoning. It's especially easy to make when you use a food chopper to chop all the veggies! Also you can cut the quantity of the ingredients accordingly. My husband  isn't too fond of peppers or celery, so I actually cut the recipe  by 1/2 and still had plenty (and he got a baked potato).


Remoulade Sauce

2 c Creole mustard
4 tbsp celery, diced
4 stalks green onion, chopped
1 tbsp paprika (I use Pride of Szeged Hungarian Paprika in the big red can)
1/3 c salad oil
1/4 c white wine vinegar
4 tbsp garlic, pureed
dash of salt
3 tbsp prepared horseradish
1 tbsp Worcestershire sauce
lettuce

In a mixer or blender combine all ingredients and blend until smooth. Chill completely. Serve over boiled or steamed medium shrimp arranged on a bed of shredded lettuce. Yields 3 cups. You can also easily halve it as I did.


This is so much better than the pre-made remoulade sauce you can buy in the store! I also use a little Old Bay when steaming the shrimp to give it a little more spice.


I just love my little glass fish dishes. They are perfect for serving shrimp!

Happy eating!

Tuesday, June 22, 2010

Breakfast in the Big Easy - Classic Beignets

First of all, I want to tell you I was up till almost 4 in the morning last night. I had bought a 3 pack of Starbucks Via Ready Brew. It is instant coffee that is supposed to taste like a fresh brewed cup. I opened a pack of the Columbia which is a medium brew. I think Starbucks needs to put a warning on the label that drinking it too late at night causes a huge caffeine rush which results in extended periods of sleeplessness. The stuff is better than No-Doze! Usually I can drink coffee late at night with no ill effect, but this time I just couldn't sleep. So I figured it would be nice to plan something for the morning. After writing the post about the Shrimp Creole I figured why not continue our trip through the bayou to the Big Easy? One of my very first memories of New Orleans is sitting at Cafe Du Monde http://www.cafedumonde.com/ in Jackson Square at 4 in the morning with a big hot cup of cafe au lait and a basket of freshly made beignets covered in powdered sugar.

Beignets (pronounced bey nyay) is basically a deep fried doughnut without the hole. According to my research, some historians believe that the Ursuline Nuns of France brought the recipe to Louisiana when they arrived in 1727. It is also believed that the beignet is the father of the raised donut!

Most all recipes for beignets include yeast. So you need to do a little planning if you want to make them.   This particular recipe requires the dough to chill for 8 hours, so it is best to make it overnight as I did. Let's begin!

The recipe for these particular beignets is from the cookbook "New Orleans Classic Desserts, Recipes from Favorite Restaurants"  by Kit Wohl. It is 95 pages filled with beautiful color photographs, background on the  the restaurants and 45 luscious desserts.


 Here is a list of the ingredients:                                  


1 package active dry yeast (1/4 oz)
3/4 cup warm (110 degrees) water
1/4 c evaporated milk
1 tsp granulated sugar
pinch of salt
1 large egg, beaten
4 - 4 1/4 c  all-purpose flour
Vegetable oil for deep frying
Powdered sugar


Stir together the yeast and 3/4 c warm water in a 2 cup measuring cup. let stand 5 minutes. In a large bowl, stir together the yeast mixture, evaporated milk, sugar, salt and egg until blended. Gradually stir in enough flour to make a soft dough. Cover and chill the dough for at least 8 hours.

Place dough on a well floured surface and knead 5 or 6 times. Roll dough into a 15" x 15" shape and cut into 2 - 3 inch squares. Smaller beignets will puff and brown faster, so do not leave them unattended.

Pour oil to depth of 3 -4 inches in a deep skillet or Ditch oven and heat to 375 degrees. Place each beignet in the hot oil. Working rapidly, fry several beignets at a time, not letting them touch, for approximately 1 minute on each side. Turn with tongs to brown each side evenly. Drain well on paper towels and sprinkle warm beignets with powdered sugar.

Serve immediately, piping hot.

So after mixing the dough and putting in the refrigerator to chill, I rose at 9 am and finally got cooking. Unfortunately my husband was at work, so I really didn't need to make the whole recipe (they really should be served piping hot) so I only fried half the dough (though I did eat all the beignets!).

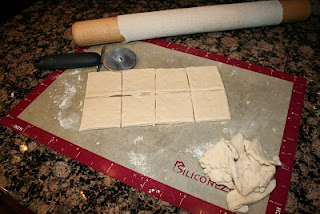
Dough rolled out to thickness:


I uses a pizza cutter to cut the dough into 2" squares.


My Dutch oven comes in handy for frying. I used canola oil and heated it to 375 degrees. Then I placed the beignet dough into the hot oil. Fry till golden.


Then you dust the hot beignets with powdered sugar (this is a light dusting compared how you get them at Cafe Du Monde)!


Mmm Mmm Mmm! Enjoy!